Saturday, July 31, 2010

Teaser Day 1!

It is teaser time and you know what that means! It is getting close to the monthly release time at My Favorite Things! Here are a few details you should know about this month's release:
Teasers begin July 31st and will happen every day until and including release day. You can find the list of designers for teasers each day at 11am EST on the MFT Blog.
The release party will be happening on the MFT Forums on August 4th beginning at 8pm EST (that is 5pm for us here in the pacific time zone).
Don't forget to check out our guest designer contest this month. You can find all that info in the forums HERE.
The big "Hop and Shop" day will be release day (August 4th) where you will be able to hop and see all the goodies on the designer's blogs and then do a "shop" the festivities will begin on the MFT blog.
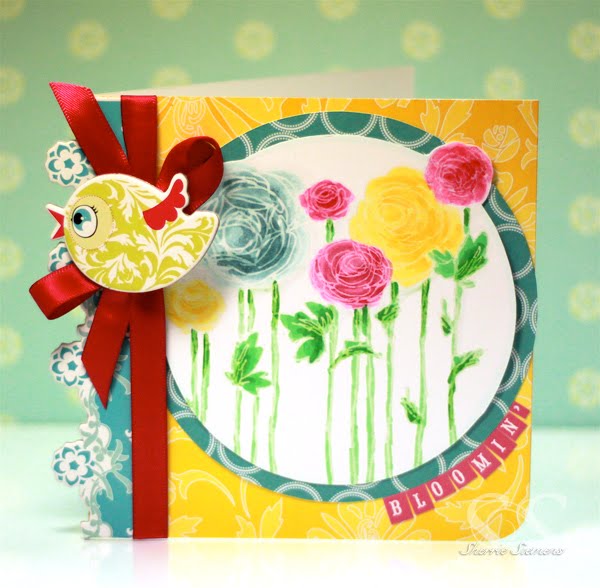
Here is my teaser.....this is actually a vellum card. I stamped these images from the "How your garden grows" set in Brilliance and Stazon inks and then colored the flowers from the backside with my copics. It is so pretty and sheer. This is also one of the sentiments in the set as well.
I love that there are different sizes of the flowers and some are solid where your ink will do the coloring and others are open (like I used in this card).
The couple of cute strips of patterned paper are from the vintage posy line at Melissa Frances.

Ready for some TOP-SECRET news? Today, there is a prize hidden on one of the designer's blog posts. As you make your way through the Teaser Time posts, simply leave a comment on each blog, for your chance to win one of the Brand Spankin' New stamp sets being released on August 4th. A winner will be chosen from the comments on the pre-selected blog before tomorrow's teaser list goes live, and will be posted on Kim's blog HERE. Be sure to check tomorrow to see if YOU are the winner. You can play along each day for your chance to win. We will be giving away NINE new stamp sets this week! As always, you can find the master list of participating designers HERE on Kim's blog.

Thursday, July 29, 2010

Evenings of Summer

OK....last post I showed you a glimpse of the fun "days of summer"....here I wanted to show you how I have been enjoying our evenings....

Yes, on our deck and soaking in the beautiful view...you can imagine me cupping my hands around a fresh made latte and smelling it in.....breathing in deep and enjoying the view!
That little snipit of tree that you see in the upper right corner is in our yard....

Hope you are all enjoying your summer.....I have some fun MFT teasers that are starting on Saturday....

On a certification note: Did you notice applications are now available (For store owners, instructors and designers) for Calgary September 26th! This class always fills up super fast.... the application you can find on my sidebar....

Tuesday, July 27, 2010

Simple Fun!

Looking for a good giggle....make sure you watch the little youtube clip at the bottom of this post where you can see Marie sliding!
This was so fun to watch my kids do that I needed to create a fun page about it. This is at my in-laws farm, they have a steep grassy hill at the back and they had fresh sheets of cardboard....the perfect summer toboggan!

This was done exclusively with Melissa Frances products....I know....not the typical Melissa Frances layout but I wanted to show how you can use their product line for fun layouts like this one!
These photos were printed black and white and then I took my aqua painter and filled it with copic blending solution and then picked up various refill colors and painted them on my photos. I colored these boxes (E31) and the grass (YG25) and her shirt (RV34).
The fabulous Melissa Frances rub-ons added fun captions to my boxes.
I also used my YG25 reinker to color my twill that I stapled on as an accent as well.
Copic multiliners can be used for wonderful illustrating....but here I use mine for some simple journaling.

OK....now the clip you will want to see!.....

Monday, July 26, 2010

A Little Christmas

I realized over the weekend that I had a couple of winter designs that I hadn't shown you. They are both featuring some felt....
I love the big nest pears from spellbinders and have always thought that pink and gray are a beautiful color combo. All the little letters and chipboard letters are Cosmo Cricket.
I love stroking this card with it's texture!
Another little felt card....this one all the snowflakes and the background are felt. Again, I used spellbinder dies to cut out my felt pieces and on this particular design I used my Copic Airbrush system to add some E33 to the center and the edges. I did a reverse mask for the center of the card.

Hope you all have a fantastic day as many of you are packing up and heading out to CHA this week....I am a WEEENSY bit jealous! I am looking forward to hearing all the latest and greatest when everyone gets back home....in the meantime, I plan on spending a lot of playtime in my studio this week (I think it misses me)!

Friday, July 23, 2010

Sketch Friday!

One of my favorite little stamp sets from My Favorite Things....this is "Meet Emma and Wyatt" and they are just TOO adorable. My little "butterflies" from the sketch are actually my sentiment words (from the tiny type of the Cosmo Cricket's DeLovely collection). The large sentiment at the bottom is actually one of the border strips from the DeLovely collection that I cut up so that it would fit on my card.
I freehand sewed the heart and colored it with my copics....doing a lot of fading away to white to keep my colors very light. This is where all those pale colors come in really handy!

Here is the sketch so you can play along in TAYLOR'S challenge.
Don't forget to see what the rest of the sketch crew came up with:
Jami Sibley: More is More
Monika Davis: M.A.D. Stamper
Melissa Sauls: In Stamping Mode
Alice Lihsuan-Wertz: Alice's Little Wonderland
Lisa Hjulberg: The Craft's Meow
Rosie Hughes: Love my Craft Room

Wishing you all a wonderful weekend!

Thursday, July 22, 2010

Something I kept...

First of all....thanks to all of you who purchased my CHF stamps...I know you will enjoy them as they are the best in rubber!
I did, however, keep a few.....this little piano girl is so perfect....and since we are such a "piano" family, I just couldn't part with her!
Here is a little card I made for our piano teacher for Christmas.
I know, Christmas, you are thinking it is July!....LOL....just staying ahead of the game where I can. Actually nostalgia won out the other day. We were organizing all my daughter's school memorabilia and came across a few of her first piano pictures.....she couldn't even touch the floor! Nostalgia also got me while sorting my CHF stamps and I still grin every time I pass this stamp.
Here are all the specific card details:
Supplies:
Stamps:
Little Piano Girl (SEP), Christmas Expressions (MLM) by Cornish Herit
age Farms
Ink:
Black Brilliance (Tsukineko), Cranberry Adirondack (Ranger)
Paper:
Petite Papers (Webster's Pages)
White Card Stock (Neenah)
Accessories:
Copic Markers
Chipboard Flower (Basic Grey)
Pointsetta (Prima)
Black, Garnet Spica Glitter Pens (Copic)
Tiny Type Stickers (Cosmo Cricket)
Suede Brad (Making Memories)


See you tomorrow for sketch friday!

Tuesday, July 20, 2010

VIP Blog Hop and Shop


Welcome to the VIP blog hop and shop for My Favorite Things!
What is VIP? It is a ONE DAY ONLY product that gives you the opportunity to purchase the WTG set TWO WEEKS early. Here are the details about the VIP Kit:
August VIP (July 20th 10 PM EST through July 21st)
Who’s That Harvest Girl? VIP $36
Who’s That Harvest Girl? $15.95
Girly Net Ribbon Collection (2 yards each of netted ribbon in Lipstick Red, Cool Green, White Tulle, Sassy Black, Girly Pink) $5.95
5 yards 5/8” Black Saddle Stitch Ribbon $3
Olivia Basic Grey 6 X 6 patterned paper pad $6
Set of 10 Scalloped A2 Notecards in Black Linen $4.85
Garden Goodness mini stamp set (FREE, $9 value)
Additional release on VIP night:
Strawberry Carton and Strawberries Template $3.95

If you have hopped here from Susan's blog then you are hopping along just fine...if you want to start at the beginning of the hop then go to Kim's blog.
Here is my little project using the new "Who's that Harvest Girl?". Now is definitely the time of year for harvest....I don't know about your counter but mine is full of the fresh fruits and veggies of the season. I just made a HUGE batch of jam today using fresh berries that I went and picked.
This little gift tag I made out of canvas. Just a scrap was all I needed..... I stamped in versacraft ink and heat set with my gun before coloring with my copics. I fabric pieced her basket with the Michael Miller fabric that I used on the tag.....amazing what you can do with just a few scraps of things. Sewed it up around the edges to secure and punched a big ol' eyelet through the corner.

Next on the hop the fabulous Barbara! I know you are gonna love her project (I saw a sneak peek of it....heehee)! Happy Hopping/Shopping!

Monday, July 19, 2010

Monday Cruisin'!

How fun it would be to find this little beauty at the end of the rainbow! It gives me the happy 1970's feel!
I stamped this car from My Favorite Things in black brilliance ink and then embossed it with clear detail powder. I then colored a few areas with my copics....the tires, mirrors, convertible top.
The paper is from the Cosmo Cricket DeLovely collection.
Here are all the card deets:
Stamps:
Cruising Cosmo Girl (My Favorite Things)
Ink:
Black Brilliance (Tsukineko)
Paper:
DeLovely (Cosmo Cricket)
Accessories:
Clear Embossing Powder (Stampendous)
Copic Markers
Chipboard Rainbow (Cosmo Cricket)
Sticker border (Cosmo Cricket)
Corner Chomper (We R Memory Keepers)


Looks like another gorgeous day here! We are getting spoiled in July! See you tomorrow for the VIP hop to see the newest Who's That Girl?!

Saturday, July 17, 2010

CHF FINAL BLOWOUT!

ETA.....SOLD!

LAST KICK AT THIS!
Ready to box the rest of it up and send it out to ONE person.....
If you would like to be that lucky someone....I am selling what is listed below at $80US (plus $10 shipping) for the whole lot.

First come, first serve!
E-Mail Me and I will send you the paypal info....

Thanks!
RUBBER CLING MOUNTED

Kim Hughes Collection Large Sets

Bloomin' Beautiful $14
Making the Grade $14
Bold Curls $14
Supah Star $10 (one stamp with paint on it, still stamps great but is stained)
Comforting Hugs $14
Pretty Birds $14

Kim Hughes Medium Sets $8 each (unless otherwise stated)

Birthday Bash
Number Fun
Playful Alphabet
Fall Silhouettes
Congrats Grad
Little Boy
Four Square

Kim Hughes Small Sets ($6 each)
Quirky Alphabet
Ahoy Matey
Happy Trails
Sweet Thang


The Rummage Bin Large Sets ($14 unless otherwise stated)
For The Men


The Rummage Bin Medium Sets ($8 unless otherwise stated)

The Great Canadian Stamp Set
Round & Round We Go
So Happy


Mona Lisa Moments
Train Expressions ($5)
Big Inspiration ($7)


Shady Tree Studios (These do not have the index picture sheets, therefore they are priced very low)
Vegetable Harvest ($6)
Fruit Basket ($6)

Odds and Ends
Primitive Flourish ($2)
Primitive House ($2)
Primitive Sheep ($2)
Country Charm ($2)
EST. 1862 ($2)


WOODMOUNTED

Thomas Kinkade
Hometown Pride Vignette $5

Friday, July 16, 2010

Sketch Friday!

Happy Bloomin' Friday! I was in the mood for something bright and cheery and Cosmo Cricket's Line of "DeLovely" is perfect for that!
My main image is actually stamped in versamark and then heat embossed with clear detail powder. I wanted to be able to color these blooms and not have a black or brown line, rather a white one to match the patterned paper I was using.
The stamp is one large one from Stampendous.....er...it is a flower that starts with a "R". Ranunculous?...I know I am spelling that wrong.

I love the "painted" quality these flowers have that are colored with my copics.
NOTE: only use CLEAR embossing powder when trying this in combination with copics. If you use a colored embossing powder your copics will pull the pigment out of it and smear it all over your image....not the desired effect.

Photography speak.....I bought a new lens for my DSLR. It is called the "nifty fifty" a 50mm fixed point lens that has a 1.8 F-stop. This is great for photographing my cards....nice crisp card, very blurred background. A great little lens for just over $100. Seems to be very nice for low lighting settings too....I hate using my flash.


Here is the sketch so you can play along in TAYLOR'S challenge.
Don't forget to see what the rest of the sketch crew came up with:
Jami Sibley: More is More
Monika Davis: M.A.D. Stamper
Melissa Sauls: In Stamping Mode
Alice Lihsuan-Wertz: Alice's Little Wonderland
Lisa Hjulberg: The Craft's Meow
Lori Craig: Making a Difference
Rosie Hughes: Love my Craft Room

Off to enjoy a beautiful weekend here on the west coast. Summer has finally arrived and it is a wonderful temperature....not too hot with a slight marine breeze.....heavenly!

Wednesday, July 14, 2010

à la modes BLOG HOP!

What a special month this is as My Favorite Things is launching a brand new line! Have you seen some of the à la modes around yet? You will see plenty on this hop! Here is a little info about them!
BRING ON THE RUBBAH!
* à la modes will be available only in rubber
* Each set is produced in the USA using the higest quality rubber, with the deepest etch possible.
* Each image and sentiment is backed on cling foam and scroll cut, making it ready for stamping right out of the bag!
* Packaged in a clear hang bag, we've also provided the ideal storage solution by including a thick laminated header card in each set that can be used to store the stamp set, in its entirety after purchase.
* $10.95 for the 3 x 4" set.

If you have come here from Susan's blog you are hopping along just fine....if you are a regular visitor to my blog then you may want to start at the beginning of the hop.....HERE.
I get to show you the fabulous à la mode BIRTHDAY GIRL! Love that big ol' cupcake she is holding. I was inspired by the cupcake and decided to make my own felt version.
I used all MFT felt...love this stuff, it cuts with the dies so well!
I used the tops of the spellbinder ice cream die and then cut my own bottoms. I also machine stitched them on.

The finishing touch for my cupcakes....the fun little banner tags I created using the Die-namics Banner day die from MFT! I thought it was a fun touch for the sentiment!
Here is a little close shot. I colored her with my copics and then cut her out with my oval spellbinders die and airbrushed the edges. Gotta love R81 for that beautiful soft pink!

Off to see some more à la modes lovin'! Gotta go see what Barbara cooked up for this hop! Enjoy!

Monday, July 12, 2010

A Moxie Monday!

I was so inspired by this month's Moxie challenge that I not only made a card but a fun matching layout too! HERE is the challenge on Moxie Fab World if you want to check it out...
Ahhh, never too old 4 bubbles! This is my daughter playing with the bubble wands that were set out for her younger cousins....but she couldn't resist! I used LOTS of Melissa Frances goodies from their Vintage Posey Collection. The big beautiful blooms on the page matched the very pretty roses in the photo. You can see I went with the circle (bubble) theme using a mix of my Spellbinder dies and large circle cutter by EK Success.

I am also LOVING the new Banner Alphabet that was just released at My Favorite Things....what a nice clean font....it is the "NEVER TOO OLD" segment on my layout.
I had a leftover photo that I made the card from. The scraps of the circle cutouts were what I used in my card to carry out the circle theme. I also had my Melissa Frances rub-ons follow the curves of my bubble.
A couple of notes:
All these photos were printed in black and white on my home printer....I then took my water painter and filled it full of copic blender solution and colored selected sections of the photo. In this instance I colored her swimsuit, bubble wand and the green in the shrubbery.
Here is a close shot of just the page.
Again...this photo WAS black and white. I love the vintage flavor just coloring sections of the photo gives. See the roses (I colored them) and the green in the shrubs....I think this draws your eye to my daughter (whom I left in black and white).
Close ups of the other random photos. I used the vintage posy labels to back them.
I didn't have the right colors of letters so I used the negative portion of the glittered letter sheets from MF for the "B". The rest of the letters are Cosmo Cricket where I painted them with white crackle paint and then airbrushed them with R85 to match my page.
I loved this little sentiment rub-on as well, framed with another vintage posy label.
Lastly this little tag detail.....love this sentiment too! Tied on with a little vintage posy ribbon!

Thanks for coming to look today! I had so much fun first of all taking the photos (with my new camera) and then converting them into a page....My daughter now has this tacked up on her wall....
Enjoy your MOXIE day!

Friday, July 9, 2010

Sketch Friday!

So many fun things to share with you in today's card! First of all....if you scroll down, you can see the sketch.....even though I had the sketch on my computer RIGHT BESIDE ME....I deviated.
I saw those sections across the middle and knew what I wanted to do with the coffee cups and garden pea pods...but then I didn't want to cover it with this fantastic sentiment. Sooooo here is my very LOOSE take on this sketch.

The coffee cups are from a very oldie but goodie set called "hot stuff" from My Favorite Things. I stamped them directly on my kraft card stock and then colored them with my copics. This is always such a neat look instead of always coloring on white or vanilla card stock.

A little aside...... notice the staging for the card. Well, since I have a new DSLR camera I have ventured outside of my make shift light box into my kitchen for this card shot. I even shot it in a manual mode.....gasp......I'm still learning the jargon (ISO, F-stop, shutter speed etc.) but it is sure fun to play and in natural light the colors are way more true!
Here is a little close up of the fabulous new sentiment that is in a set that is in the triple scoop promo at MFT HERE.
I also used 2 new die-namics dies. Those sweet little felt rolled flowers are actually a die, you just roll em' up and glue em' on! I couldn't resist adding the little coffee beans to the centers.
The other die is the Framed Greetings Die and yes, lots of different sentiments you can use in the centers of these!

Here is the sketch so you can play along in TAYLOR'S challenge.
Don't forget to see what the rest of the sketch crew came up with:
Jami Sibley: More is More
Monika Davis: M.A.D. Stamper
Melissa Sauls: In Stamping Mode
Alice Lihsuan-Wertz: Alice's Little Wonderland
Lisa Hjulberg: The Craft's Meow
Lori Craig: Making a Difference
Rosie Hughes: Love my Craft Room

Notice the new girl on the sketch list.....WELCOME ROSIE to the sketch crew!
Have a great weekend...try to stay cool!

Thursday, July 8, 2010

SALE!

Can you say PURGE?.....
I am going to be hitting the pavement (literally)...parking lot pavement as I will be part of the "Parking Lot Fundraiser Sale" at Classic on Alexander!
(located in Chilliwack, BC)
So what am I doing right now? Pricing and more pricing....so if you are looking for a great deal on gently used stamps...come visit me on Saturday! I literally have 100's of stamps that need a good home....

See you then!

Wednesday, July 7, 2010

Blog Hop Release Day!

Yeah.....It is release day at My Favorite Things! SOOOO many sweet things this month and I am really pleased with the little card I get to show you today!
First off, blog hop info...
If you have come here from Joanne's blog you are hopping along just fine...If you are a regular visitor of my blog you might want to start at the beginning of the hop which is Kim's blog.
She is so fun! You can color her or dress her up in any of your favorite team colors. I just knew I had to have a little fun with her pom poms! I did my embroidery floss in big loops and went in and out of the paper several times. When I had enough loops then I just snipped them in half, trimmed to the right length and then fluffed them up a little.
Here are all the card deets:
Stamps:
Cheerleader (PI), Thanks a bunch by My Favorite Things
INk:
Tuxedo Black Memento (Tsukineko)
Paper:
Boyfriend Collection (Cosmo Cricket)
Core Impressions Cosmo Cricket (Core'dinations)
White (Neenah)
Accessories
Markers, Orange Spica Pen (Copic)
Embroidery Floss
Journal Tag, Tiny Type Stickers (Cosmo Cricket)
Sanding Block


Here is a little close up of those pom poms....

Where to next on the hop? None other than the fabulous JEN! I'm sure she has some fun eye candy for you!
Thanks for visiting! You can see what is "Brand Spanking New" clicking HERE!

Tuesday, July 6, 2010

Teaser Day and Copic Hair Tutorial

It is teaser time and you know what that means! It is getting close to the monthly release time at My Favorite Things! Here are a few details you should know about this month's release:
Teasers begin July 3rd and will happen every day until and including release day. You can find the list of designers for teasers each day at 11am EST on the MFT Blog.
The release party will be happening on the MFT Forums on July 7th beginning at 8pm EST (that is 5pm for us here in the pacific time zone).
Don't forget to check out our guest designer contest this month. You can find all that info in the forums HERE.
The big "Hop and Shop" day will be release day (July 7th) where you will be able to hop and see all the goodies on the designer's blogs and then do a "shop" the festivities will begin on the MFT blog.
Meet "Just for you" Jolinne.....I love the little giggle expression she has on her face. I colored her with my copic markers. I took photos of the "hair" coloring as I went for that tutorial just keep scrolling.
I paired her up with Melissa Frances papers and embellishments from the "vintage posy" collection. They seem to be a wonderful sweet match with the Jolinne images.
Notice the edge of the card? That is using the Jumbo Scallops Die-namics die. How fun to have a decorative edge.
Here is a close shot of her colored up. I colored the little pearl embellishments with my markers as well. The dress is a RV91, 95, 99 combo.
Now for the hair.....
This is the color combo I used for the hair.
I start with my base color (the lightest one) and color everything EXCEPT where I will be putting highlights. By leaving these areas white....they will see the least amount of ink as they will only be filled in at the end giving it the highlighted look.
I come in with my next darkest shade. I came in with this color about 75% so that you could still see about %25 of my base color.
My third darkest color I came in at about %50 percent. So now you should see %50 of your darkest color, %25 of your midtone and %25 of your lightest color.
Come back with your midtone color and blend the darkest line you created (the E57 line).
Now come in with your lightest color and blend the last line....STILL leaving the white areas white.
Now I come in with my lightest marker and fill in the white areas and make sure all my lines are blended.
Note: The more of this light tone you apply to the paper the more it will move your dark tones to the edges.
For the last step I take my darkest marker that I haven't used yet (E59) and my midtone marker (E53) and by touching the light tip to the dark I rub a little of that dark ink off onto my light marker. I then use this light marker to blend in some darker spot in her crown of her hair and where the deepest shadows would be. In doing this I am applying dark color and blending with my midtone color ALL IN ONE STEP. Lovingly referred to as the "tip to tip" technique.
This is also your opportunity to set it down and look to see if you need some more contrast or not....This is what I love about BUILDING color, you can always add more dark tones if you need to.
You can scroll back up to check out the finished product again.
Hope that helps you a little with your hair......us girls always need good hair tips, don't we!

See you on release day (July 7th)....I have something UBBER cute to show you!

Saturday, July 3, 2010

MFT Teaser Day!

It is teaser time and you know what that means! It is getting close to the monthly release time at My Favorite Things! Here are a few details you should know about this month's release:
Teasers begin July 3rd and will happen every day until and including release day. You can find the list of designers for teasers each day at 11am EST on the MFT Blog.
The release party will be happening on the MFT Forums on July 7th beginning at 8pm EST (that is 5pm for us here in the pacific time zone).
Don't forget to check out our guest designer contest this month. You can find all that info in the forums HERE.
The big "Hop and Shop" day will be release day (July 7th) where you will be able to hop and see all the goodies on the designer's blogs and then do a "shop" the festivities will begin on the MFT blog.
Today I am previewing the "banner day alphabet"! Along with this fabulous new font of alphabet (which comes with both upper and lower case) you will be able to purchase this new banner die from the Die-namics line at My Favorite Things!
I am dreaming up all the little sayings or "banners" that I will now be able to spell out! Yeah!
I pulled out Wyatt from the "Meet Emma and Wyatt" set and took the dog from the "Tree Swing" set and joined them together with this banner.
I used my multiliner pen to draw the little string.
I did get a little Die Crazy on this card....notice the nice felt grass and the clouds in the sky. Both MFT Die-namics as well! I particularly enjoyed creating this scene with a little masking and my airbrush system. I colored all my images with copics and then did something fun for the sky....Keep scrolling and I'll show you how!
I used the die-namics cloud die to cut out several clouds from my masking sheet. I also stamped Wyatt and the dog with stazon and created masks for them too!
On a plain sheet of Neenah paper I stamped my Wyatt and dog images in Memento ink and then covered them with my masks. I also placed the masked clouds in the sky, overlapping them a little for interest.
I then used my B00 copic marker and used the airbrush system to spray my blue sky. I tried to keep the largest concentration of the blue ink right around the ridges of my mask so they would have a nice clean image line.
Here is what it looked like after airbrushing. See how I keep my little masks with the stamp sets that they belong with....perfect for using next time!

Thanks for popping by today....being a long weekend and all! Hope you are enjoying it!
I know I am....I made a wee purchase over the weekend.....a new camera! My dive into the SLR world! I can't wait to play a little with it!

Thursday, July 1, 2010

Happy Birthday Kim!

Happy birthday to you, happy birthday to you, happy biiiirthday Mrs. Kim......Happy Birthday to you! (Trust me, I was so in tune and it sounded beautiful....lol)!
Well if it isn't the one and only MFT ladys' birthday! So to celebrate many of us have made a fun birthday hop especially for Kim! Using sweet little Emma blowing kisses that you can find HERE at the MFT store.
Isn't she darling paired up with this quite contrary paper by My Minds' Eye!
Colored with my copics and the seam binding is made with my own shimmer spray using YG95.

Looking for birthday card ideas?....This whole list of crafters is celebrating Kim's birthday today so I am sure there is a TON of birthday inspiration here!
Happy Hopping!