Showing posts with label Michael Miller. Show all posts

Wednesday, September 8, 2010

Prepping for School

Have you noticed the new tabs across the top of my blog? There you will find updated copic certification info.....I will try to keep this really current for you!

Something a little crafty today....
Do any of your kids have trouble with their binders falling apart? In my attempt to make some durable (yet previously ugly) binders a little more funky I covered them with fabric.

My huge helper in this project....my XYRON CREATOPIA! I ran large sheets of fabric that were 12" wide through my machine and added adhesive to the backside of my fabric.
Then to finish the edges I put my polka dot ribbon through the xyron as well....

I chose this nice dark fabric by Michael Miller for this project....hopefully they will last a few months....if not, they will have looked fun and very original in the process!

Thursday, March 11, 2010

Rock On

What a fun quick project this one was that I have to show you today. My daughter wanted a funky little case for her itouch and this worked perfectly! First of all the image.....this is from the pure innocence collection called "Tweeny Tween Rock On" from My Favorite Things!
A couple of Christmas' ago I made both my son and daughter large bean bags so this image totally reminds me of what I see when I walk into their rooms.
Here is a close shot of the image...I have had a few people ask me about ink for fabric. I use VERSACRAFT ink from Tsukineko for stamping my images and then heat set it with my iron. This image I stamped on canvas...so it is very textured. I colored it with my copics. Copic will fade over time in the wash...just like any other dye based ink so I try to stick to projects that I may occasionally throw in the wash but not wash daily.
I had fun with her bean bag chair. I "fabric pieced" it by stamping it on a scrap of my lining fabric and then cutting it out and running it through my creatopia to give a fabric adhesive to the backside (like a big sticker).
After I was done with my image I cut it out with my spellbinder die and added sticker backing to that as well.
The fabric is GORGEOUS Michael Miller corduroy! I didn't need to add cotton batting at all because the fabric was so thick....love it!
Here is a shot of it with the itouch tucked inside. I measured her itouch then added 1" in width for my cut out measurements and added a little extra length so that I could roll over the top to reveal the fun lining. Added a button and string to be able to secure it and it was done! My daughter loves it!
Enjoy your day!

Monday, March 8, 2010

Cupcake Picnic

Happy Monday! How about something fun and whimsical for today? Now that we are approaching warmer weather it makes me think about the fun spring and summer things we can do. Everyone loves cupcakes....how about a little cupcake picnic. This is a really fun little table topper that I made in the shape of a cupcake. All Michael Miller fabric.
I bought these adorable cupcakes from "Tracy Cakes" in downtown Abbotsford, BC. Super Sweet! I cut out large scallop circles with my spellbinder dies out of the scrap fabric to make little matching liners for the cupcakes. I used some of the fun stickpins I have from Fancy Pants and made little tags. I stamped the sentiments from Kim Hughes' "Baked with Love" set from Cornish Heritage Farms.
Here is a close up of my fabric cupcake. I stamped the little Kim Hughes cupcake in the centers of the dots on my fabric and then colored them in using the coordinating copic marker. I used my fabric tac adhesive to glue on my large brown ric rac.
The little table and chairs? We used them for our kids when they were little as their coloring table...passed down from Daddy. Hope this puts you in a fun springy creative mood!
Have a great day!

Tuesday, March 2, 2010

A Little Artsy.....

Ready for something totally different?....This is what happens when I just "play"
My love of fabric often collides with my love of papercrafting. Today I was playing with a few "new" things! I just received my nesting owls from Spellbinders so I cut some of my new Michael Miller Corduroy fabric with it. I ran it through my creatopia to add fabric adhesive to the backing as well.
The center image is by My Favorite Things that I stamped in versamark and heat embossed clear detail powder. Sometimes it is nice to have a white outline instead of always black or brown. I colored him in with my copics.
I had the pleasure of meeting Traci Bautista while in Anaheim and watched her demo copics on canvas.....HOW INSPIRING! I loved the freedom of just drawing free hand. This is how I created my branches and flowers that my owl is sitting on.

Now I know this look isn't for everyone....it is definitely more "mixed media"....but it is so fun to experiment and play! I hope I encouraged you to do this today!

See you tomorrow for MFT's release day!

Thursday, January 28, 2010

CHA and Copic Certification News

Back home from CHA!
Whew....what a week! There was so much to see and so many of my favorite girls to reconnect with that I am definitely feeling the after effects of a very busy week.

CERTIFICATION DEETS:
First of all.....I had a fabulous time teaching two wonderful certification classes at CHA! We had a blast learning the techniques and playing with color. Thank you to all whom have e-mailed me personally and told me how much you enjoyed it....HUGE warm fuzzies all around!

What does 2010 bring? After speaking to stores at CHA I have created a TENTATIVE schedule. Applications for these events will not go out until 60 days prior to the event but I wanted to give you an idea on my schedule.
If you are a store and see me coming to your area please feel free to contact me via e-mail if you are interested in some consumer classes in your shop.

Here is my schedule:
March 28th
Portland, Oregon....CONFIRMED

April
Calgary, Alberta (April 11th)

May
Anchorage,Alaska (May 23rd)
Vancouver, BC (May 30th)

June
Boise, Idaho (June 13th)
Seattle, Washington (June 27th)

July or August
Kelowna, BC
Prince George, BC
Spokane, WA

Now if you don't see your area listed and you are in the Pacific Northwest area and Western Canada...please let me know if you think there would be high demand for this class where you live. I wouldn't want to miss anyone!


What did I see at CHA? A LOT! It warmed my lil' heart to see so much fabric! Basic Grey, My Mind's Eye and Cosmo Cricket had fabulous fabric! I decided to show you this card today because it is all about the fabric. The little flowers I created with my spellbinder dies and the little dress too! People were just swooning over these sweet little pure innocence girls from My Favorite Things. This one is called "Apple for you".I had fun coloring some of the new images while demoing in the copic booth.
I stamped this little girl on my kraft paper and also on my Neenah white card stock. I colored everything but her dress with my copics and then cut her out and laid her overtop of the stamped image on my kraft. I ran a strip of Michael Miller fabric through my creatopia machine with the fabric adhesive first and then stamped the dress and cut out the flowers with my dies. The beautiful tree is felt from Prima...yummm...they had some awesome stuff at the show!

Ok, I'm off to play catch up on family life after being gone a week. My daughter is having a birthday party today and I need to make a cake! Have a great day!

Monday, January 11, 2010

Pure Innocence

I didn't get to show you this PI girl during the teasers and release but I wanted to show my version of her to you now. You all know how I love to mix up fabric with paper and these easter eggs along the bottom are fabric! I added a little batting under them to make them puffy.
The eggs are cut out with a spellbinder die and run through my creatopia with the fabric adhesive, they simply become a sticker that I can paste to paper or fabric!

I colored her with my copics and then went with a little bit of pencil shadowing around her and grass at her feet AFTER I was all done with my markers.
Here are all my details:
Stamps:
Pure Innocence (My Favorite Things)
Ink:
Tuxedo Black Memento (Tsukineko)
Paper:
Girl Friday Collection (Cosmo Cricket)
White (Prism)
Accessories:
Copic Markers
Spica Pens (Copic)

Fabric (Michael Miller)
Oval Dies (Spellbinders)
Brad (American Crafts)
Prismacolor Pencils
Creatopia (Xyron)
Corner Chomper (EK Success)


Thanks for coming to look and I hope you are having a great day!

Tuesday, January 5, 2010

Fabric stamping


I know I am a little late getting this teaser up but it took a little more time than a card to create...but oh so fun! You can catch all the teasers today on Kim's Blog. I just love soft little books, wish I still had babies to play with these but I do have some little ones in my life I could share it with! How about a little softie book focusing on seasons? Yeah!
I used a combo of canvas and Michael Miller Fabric for this project....they look fabulous together!
Here is "WINTER"...using the "Flurry of Love" pure innocence girl with the new "Make the Date" set for all the sentiments in this book! I colored her with my copics and made a little felt snow pile under her feet.
Spring and Summer....these cutie pies are also being released tomorrow! They were perfect for my spring and summer seasons! Colored with copics to match the fabric colors.
I zig zaged up the middle of my book to secure then I hid those stitches with this pretty iron on felt ric rac.
How about apples for fall....This PI girl "Apple for you" was perfect for this season and I did a little chocolate brown felt under her feet.
Here is a shot of the back of the book. I made sure to catch my embroidery floss when sewing up the back flap...so that it can wrap around the little button to close.
The words in this "make the date" set are SO useful it made coming up with this idea quite easy...
Come back tomorrow for the official blog hop release and shopping!

Wednesday, December 30, 2009

Back in the saddle again....

Hello again....after a little break I am back and refreshed! Hope you all had a wonderful Christmas and a little break too!
Want to see what occupied A LOT of my time last month?...
These are the quilts I made for family. I didn't end up following any pattern, I just cut a bunch of brick size pieces in 10 different patterns and then sewed them all together!
Here is a close shot of the one I did for my husband's folks. All the fabric is Michael Miller....yummy stuff!

Here is a close shot of the one I made for my dad. I think they all really loved them and what a huge relief it was to finish them on time!

A couple of catching up things:
Did you know there are two certification classes being offered in Anaheim during CHA. They are Friday and Saturday (January 22nd and 23rd). I will be teaching both....if this is something you are looking to make a part of your CHA trip applications can be found here:
COPIC CERTIFICATION APPLICATIONS
We are going to have a blast!

Also....some fun news is going to be announced here on January 1st! Watch for that!!!!

Thursday, December 3, 2009

Good friends, good books

Read any great books lately?....other than Twilight (not a twilight fan).... I would love to know, I'm always on the search for a good read. It makes times in airports and airplanes zoom by a lot quicker! I'm dabbling and having some more fun with fabric. I love that it is so easy to apply with the creatopia machine from xyron. They get fabric adhesive applied to the back and make my fabric a sticker! No sewing required! ....My sewing machine is occupied these days with Christmas projects....
I thought the fabric circles (cut out with my spellbinder dies) made the perfect kind of "gum drop" tree.
Reading Flopsey is from My Favorite Things...I just inked the bunny and not the books so that I could rest Flopsey under the gum drop tree. Colored with copics E40, E43, BG10, BG13, BG18, YG01, YG03. I did add a little white liquid applique for flopsey's tail...cute little puff of dimension.

Here is a little close up of the fabric. All Michael Miller fabrics. I got them to puff by adding a little cotton batting under them. I just cut the one size smaller of the circle nestie through my cotton batting. Easy!

Today was a "play" sort of day....I think I am avoiding my half done Christmas projects....

See you tomorrow for Taylor's sketch challenge! Yup! We are back at it this week!

Friday, October 23, 2009

Reading is Chic! Taylor's Sketch Challenge!


This is one of my daughter's favorite books...it has seen better days as the condition of it's cover is quite poor. Enter CREATOPIA! I Love the fabric adhesive and it made doing this book cover very quick and easy! I used Taylor's sketch for the layout inspiration.
CLICK ON THE PHOTOS IF YOU WOULD LIKE A CLOSER LOOK!
Who says books can't be chic...not me! This is Michael Miller fabric...did you notice the shape of the pattern? Very similar to the labels 9 die by Spellbinders. The book is covered with fabric that I ran through the creatopia machine to apply adhesive to the backing. All I did was measure the dimensions of the book (spine included) then added an inch to each side.
I took a piece of an old sheet and stamped "Betty the Bookworm" from Stampingbella in versacraft ink. I heat set it with my iron, colored it with my copics and then ran the rough square through the creatopia to get the adhesive on the back.....THEN I ran it through with the spellbinder die. LOVED IT!
I cut a smaller nestie of the same label 9 die in cotton batting so that the image would puff. See the dimension in this picture. It is really sweet in real life!
Here is a close shot of my paper version of coloring "Betty"...she looks a lot like my adorable little niece with her chic glasses! I didn't deviate too much from the colors in the fabric. BG01, BG05, YG93,YG95, YG99, YG01, YG03.
Wow, was this ever a FUN project....now that I have tested it out my daughter says she wants to cover her hardcover bible from school....it's cover has seen better days too!

I think this would make a great gift idea...add some cool factor and cover a book to give away!


Here is the sketch so you can play along in TAYLOR'S challenge.
Don't forget to see what the rest of the sketch crew came up with:
Jami Sibley: More is More
Monika Davis: M.A.D. Stamper
Jackie Pedro: The Scalloped Edge
Lynn Mercurio: Stamperosity
Melissa Sauls: In Stamping Mode
Rachel Sztonyk: Gingerbread Gallery
Alice Lihsuan-Wertz: Alice's Little Wonderland
Lisa Hjulberg: The Craft's Meow

Enjoy blog hoppin' around and make sure you give the new gals a welcome hello!
Have a great weekend!

Tuesday, October 13, 2009

Thanksgiving Photos and Fabric Project

I have a fun fabric project to show you today. This one is using the "Fruit Basket" and "Vegetable Harvest" sets from the Shady Tree Studio line at Cornish Heritage Farms. I made these tea towels and then stamped in Versacraft ink from Tsukineko. I colored the images with my copic markers. I used scraps of my Michael Miller Fabrics and tied the colors together with hot ribbon by Junko. I carry one of these along with me to certification events so you may have seen one up close.
Here is a closer shot of the stamping....the artichoke and the olive are my favorites!
We had a fabulous weekend with family and GORGEOUS thanksgiving weather! I posted some pictures if you are interested....keep scrolling.
The tradition lives on....early in the season Grandma is out in the pumpkin patch scratching the names of each grandchild into the pumpkins...as they grow the name scars over the pumpkin. We all LOVE that! These now sit at my front door....my most favorite of all our thanksgiving decor....Thanks Grandma!
Here is my son with his pumpkin. We could only bring one of his home, the other one stayed in the field...it was HUGE! Too heavy to bring home:)
A quick close shot of my daughter enjoying the sunny day. We were loading up on the trailer making our way up the hill and to the back of the property to enjoy the marvelous view!
My son running around, I love the joyous expression on his face!
My father in law snapped this photo of Mike and I. We both really enjoyed the day at the farm, we have so much to be thankful for.
Hope you had a wonderful weekend too.
Back to my studio.....and it is all clean too (bonus)!

Tuesday, October 6, 2009

Forest Hello


Goodmorning...I have a fun fabric card to show you today. As you know I do a lot of things for publications and this often means that I am working "out of season". Sometimes it is far enough in advance that the seasons overlap a little but today I am showing you something very spring!
I was so pleased with it that I couldn't keep it to myself...lol!
The patterned layer is fabric (fabulous Michael Miller) and I used my oval nestie to cut out the shape for my images. I sewed around the oval so that I could fray the edges and see the texture of this fabric. I also used a scrap to make a little covered button as well.
I love these felt prima branches too, helps add to all the dimension going on in this card.
Here are the deets:
Stamps:
Forest Friendzy, Christmas Critters (Kim Hughes Collection) by Cornish Heritage Farms
Ink:
Olive Brilliance, Rich Cocoa Memento (Tsukineko)
Paper:
White (Neenah)
Accessories:
Copic Markers, Mint Spica Pen (Copic), Felt branch and Flowers (Prima), Crocheted Flower (Made by Me), Fabric (Michael Miller), Sewing, Oval Die (Spellbinders), Button cover kit


What did I do with World Cardmaking Day....I cleaned my studio! My mojo felt very stiffled as my studio was shrinking as I keep adding "STUFF"....so it was time to purge. Ahhh, feels great! I can create again!

Monday, August 3, 2009

Fabric Trends

I am seeing more and more fabric showing up on paper creations and I love it! This card has incredible texture IRL....wish a photo could show that all to you!

I started with my sticky back canvas and cut it into a large circle. I also cut out the bird using a Spellbinder die and some of my favorite Michael Miller fabric.
Tip: Run your die through your machine a couple of times when cutting fabric to make sure all the little edges are cut. Don't worry if it frays a little, it adds to the texture and character of the bird.

I positioned my bird on the canvas circle and then stamped the sentiment in embossing ink. Covered both the bird and the circle with embossing powder and heat set. I then removed the bird and used Claudine Hellmuths' Studio paints to paint my canvas (I used the modern red color...perfect with the turquoise of my bird). The embossing resisted the paint. I peeled off the back of the sticky back canvas and adhered it to a vanilla layer of cardstock and then trimmed the cardstock to size. This is a standard sized card.
Add the bird back (lining it up with the sentiment) and the fun felt branch leftovers from yesterday's card.
The button with the single hole worked great for the "eye" as well.
A little bit of decorative stitching and that is it! I loved the bold handmade nature this card gives.
Here are all the product details:
Stamps:
Big Inspiration (Mona Lisa Moments) by Cornish Heritage Farms
Ink:
Versamark (Tsukineko)
Paper:
Vanilla, Suede Brown Dark (Prism)
Sticky Back Canvas (Claudine Hellmuth)
Accessories:
Studio Paint (Claudine Hellmuth), Clear Embossing Powder, Fabric (Michael Miller), Button, Felt Branch (Prima), Bird Die (Spellbinders), Sewing

Monday, July 20, 2009

Monday Intentions


My monday intentions FLEW out the window when I took a peek at the challenge today over on SCS. Intentions were (and are) to get some "work" done...but how could I resist a fabric flower challenge?
What is a hobby if you can't take time out and enjoy stamping just to stamp...this was my justification brain talking...
I wish you could feel and see the texture on the card. The large blossom is beautiful Michael Miller fabric cut out with a blossom nestabilitie die cut. I first stuck my fabric to Claudine Hellmuth's sticky back canvas to give my flower some weight and to keep it from fraying. I then put it through my die cut machine and COOL a neat fabric layer to add to my card. I curled the petals a little because with the canvas back the flower is quite bendable. I have a few more ideas swirling that I am going to try this out as well. A few more hours in the day would be great!
Here are all my card deets:
Stamps:
The birds and the bees (Kim Hughes Collection) by Cornish Heritage Farms
Ink:
Tuxedo Black Memento (Tsukineko)
Paper:
Early Bird (Cosmo Cricket)
Simply Smooth White, Orange (Prism)
Accessories:
Fabric (Michael Miller)
Sticky Back Canvas (Claudine Hellmuth)
Blossom, Circle dies (Spellbinders)
Chipboard notes (Cosmo Cricket)
Copic Markers


Now to get back to my "Monday Intentions"....have a great day!

Monday, May 4, 2009

Reflecting

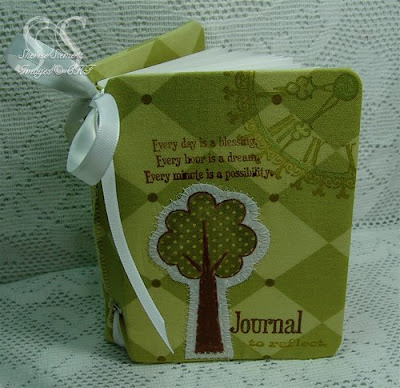
Wanna make a project with those cute rectangular coasters? Make your own little fabric journal. I just cut fabric pieces slightly larger than my coaster, sewed up 3 sides, slipped in my coaster and then zig-zagged my back opening. I stamped directly on fabric with brilliance ink. The tree is part of the new release that is this week by Kim Hughes! The tree is stamped on white and then cut out and colored with my copics. I zig-zagged it to my book to secure.

Here is a look at the spine of my journal. The front and back pieces were simply over lapped and then eyelets used to secure with ribbon.

Hope this inspires you to play with your fabric. Stamps and fabric.....what a lovely combination!

Here are the deets:
Stamps:
Summer Trees (Kim Hughes Collection), Time to Stamp, Ledger Me (Rummage Bin) by Cornish Heritage Farms
Ink:
Olive, Coffee Bean Brilliance (Tsukineko)
Accessories:
Copic Markers
Chocolate, Mint Atyou Spica Pens (Copic)

Chipboard Rectangles
Ribbon (Offray)
Eyelets (Making Memories)
Fabric (Michael Miller)


Happy Monday!

Wednesday, April 8, 2009

Easter Blog Hoppin'!

Look who's hopping around today on the CHF blog hop!
Yes, that awesome vintage "Easter Basket" image from Saturday Evening Post.
I wanted you to see a nice close shot of this image done in Claudine Hellmuth's acrylic paint.

Looking for paint application techniques and tips?
1. The higher the viscosity (thicker the paint) the more evenly it will cover your stamp. Claudine's studio line is perfect for this.
2. I use Tim Holtz's application tool with the dry cut foam on the bottom to apply the paint to my stamp.
3. Take a piece of plastic and scoop out your paint, lay your rubber stamp facing up on your table. Pounce your application tool in the paint and get your sponge good and saturated. (Notice on the pink bag my image isn't quite as clear, well that was my "first" attempt and I realized I wasn't using enough paint).
Dab the paint with the sponge on your stamp, get it good and gooey, stamp immediately.

Note: This technique works best if you are using DEEPLY etched rubber because when applying your paint...the paint will find it's way into the creases and your rubber. The creases need to be deep enough that it won't stamp out onto your project. I couldn't believe the detail I could achieve with paint on this stamp...look at that basket, you can even make out the chicks!

So....my kids aren't getting "baskets" this year....they get bags. This was a simple strip of 6.5"(the width of my cutting ruler)by 30" strip of fabric sewn in half and tied up with a ribbon and tag......easy peasy!
The fabric you ask?.....Yummy stuff from Michael Miller, it is the "Flights of Fancy" line by Paula Prass.
There you have it, my quick and easy easter packaging!
Now you want to see more easter eye candy?
Start at the source (THE CHF BLOG) and of course the other CHF chicks that played along:
Julia,Kristine,Lisa,Joanne and Becky!

Thursday, March 26, 2009

While I am away....

I wanted to inspire you with something I am missing right now. My coffee!
Here is a little gift ensemble that is easy to create but oh so fun in the packaging!
This is done with a mixture of papercraft products and fabrics.
The coffee bag holder is my fav! It is made from felt (yeah you don't have to finish edges!) and fun fabric from Michael Miller (Andalucia line). I stamped my Kim Hughes images on my fabric and colored them with my copics before stitching them to my bag.

The little handle for you to carry the bag is cut with a spellbinder die and LOOK I didn't waste the "cut out part", I pinned it to the front.
Here is how I tied in the fabric with my card. I just used my pinking shears along the edge and stitched it down. I then colored the same images on natural cardstock and colored them with copics, stitching down to secure. Cute, simple and easy!
K....it doesn't get easier than this! I used scraps from cutting the edges of my fabric and used them at my tag top as well as on the front. I used the smallest heart die cut for the little corner accent to tie in that theme as well.

I'm looking forward to flying back home tomorrow. The certification classes went really well out here!
The class I taught was SO gracious as it took me a few moments in the morning to work out my nerves. Once I started coloring though....I was fine.

Have a great day!

Monday, March 2, 2009

Baby Blessings

I shared last week that one of my close friends had a little baby girl. I was so excited as I had the perfect scraps left of beautiful material from Michael Miller to make a quilt! These scraps are from the "Ginger Blossom" collection.
Here is a close shot of my favorite part of the quilt. The "P" I traced a large chipboard letter onto my fabric, cut it out and zig zagged it into place. I finished her name with the alphabet stamps from the Kim Hughes collection. The little sheep and chick are stamped from Kim's "Sweet Spring" set as well. I colored in a little definition with my copics and added some grass ground cover.
I hope I am encouraging you to use your stamps for SO MUCH MORE than paper.
As for the pattern of the quilt. Well, I didn't follow one. I had a specific amount of fabric left in the different patterns so I drew out on a piece of paper how far each swatch would go and made my pattern accordingly.
Here is a shot of the full baby quilt. How fun it was to make something for such a special lil' bundle!

Enjoy your monday!
Psst.....did you notice the new little feature on my blog. I have been seeing these question/answer boxes around and thought it was a great idea. So if you have anything you want to ask or just want to chit chat....there it is on my side bar....

Thursday, February 12, 2009

Fabric...just can't put it down!

Do you think I could put the fabric away?....no.... especially when today's Ways to use it challenge on SCS is to use fabric! Woohoo! I love putting my fabric through my die cut machine with the nesties and that is what I did here and also added a strip along the middle. I used the fun Michael Miller fabric that paired up really well with the Amy Butler Patterned Paper.
The fabric and the paper just scream spring so I thought the Kim Hughes' Sweet Spring would be a fabulous image addition.

Here is a close shot of the flower....how fun and funky! That little brad I picked up at Michael's the other day too.
Hope you play along with the challenge today, I am going to enjoy going through the gallery to see everyone's fabulous fabric projects!
Here are all my card deets:
Stamps by Cornish Heritage Farms:
Sweet Spring (Kim Hughes Collection)

Ink:
Rich Cocoa Memento (Tsukineko)
Paper:
Amy Butler Patterned Paper (K&Co)
Simply Smooth White, Suede Brown Dark (Prism)
Accessories:
Copic Markers
Felt
Fabric (Michael Miller)
Brad (Colobox)
Sewing Machine

Sunday, January 4, 2009

Urban Baby Couture

Need a personalized gift? How about these baby girl/boy gifts? The fabulous fabric is Michael Miller and I added a stamped panel to the front. This is from Kim Hughes' "Baby Love" set. The little baby bib image and the "got milk?" are my favorite! Another wonderful use for those copic markers. I thought this made a very hip bib duo.
They are so easy to make. I just drew out a shape of a bib on a piece of paper and used that for my pattern....the brown binding around the edge finishes them just like you would a quilt.


We all need baby gifts now and then, with adding stamping they are entirely original....LOVE THAT!
Enjoy your day!